Super Simple, Quick, and Elegant Earrings
Terry Henry, Terry Henry Glassworks
Project Skill level: Beginner
Time to complete project: 30 minutes
This design is perfect for flat beads, buttons, bits of sea-glass, or any “two-dimensional” treasure you want to showcase. This design produces the lightest most comfortable earrings, and the design may be embellished to make it even more special.
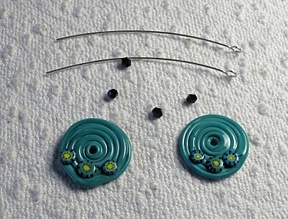
1. I usually start by laying out my elements so I can get an idea of how I want to assemble my earrings (photo 1). To make a pair of earrings I need the following materials:
• Approximately 8.5 inches of 20-gauge round sterling silver wire
• Matching set (more or less) of disk beads with a 3/32-inch hole or less
• Four 4mm bi-cone or round beads.
The tools used include:
• Flat file
• Cup bur
• Round nose pliers
• Flat nose pliers
• Flush cutters
• Hammer and bench block
2. Cut the sterling silver wire into two equal lengths of roughly 4.25 inches. The wire can be made shorter or longer depending on how long or short you would like your earrings. These instructions are for 2-inch-long earrings.
Sterling silver or fine silver may be used however I do not recommend any other wire unless it is gold.
File both ends of the wire flat to remove any marks or sharp edges (photo 2).
3. Using the cup bur, round the ends of the wire (photo 3). This creates a smooth ear-wire. This step is very important and while it is not visible it makes all the difference in how easy it is to wear the finished product.
Another note about wire gauge: I have found that 20–gauge wire is the best gauge for ear-wires. It is thick enough to hold a shape and not so thick that it hurts standard size ear-piercings.
4. Using round nose pliers make a loop on one end of the 20-gauge wire (photo 4).
Smooth the wire out either straight or with a slight upwards curve.
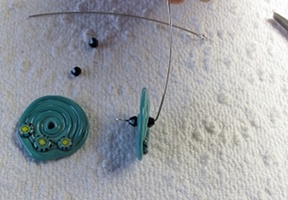
5. Thread a bi-cone bead on the wire snug up against the loop, place the disk bead backside first against the first 4-mm bi-cone bead, and lastly add the final bi-cone bead (photo 5).
Snug the assembly together to be sure the bi-cone beads occupy the hole of the disk/flat bead.
Now comes the tricky part: Using your flat nose pliers make a 90-degree bend in the wire. The trick here is to keep the bi-cone beads snug without chipping them. To do this back the flat nose pliers off a slight 1/16 of an inch before bending the wire.
6. Photo 6 shows the assembly to this point along with the right-angle bend in the wire.
Notice the direction of the slight curve in wire.
7. I use the handle of my cup bur or a chop stick to help me bend the ear-wire backwards.
I place the handle about halfway along the wire and bend it backwards toward the loop (photo 7).
8. Photo 8 shows the wire bent over a chopstick and behind the bead toward the initial loop.
This wire should extend slightly beyond the loop.
9. Gently work harden the ear-wire using a hammer and bench block (photo 9). This will help maintain the shape of the ear-wire.
The wire extends roughly 1/8 of an inch beyond the loop.
10. Using your flat nose pliers slightly bend the tip of the ear-wire so it is in line with the loop (photo 10).
11. Work harden the tip of the ear-wire by hammering (photo 11).
Congatulations! You have made an earring. Photo 12 shows the side view of the earring.
Terry Henry Glassworks http://www.terry-henry-glassworks.com
Resources:
Disk beads by the artist; contact Terry at: terry@terry-henry-glassworks.com to purchase a similar product. Sterling silver or fine silver wire it may be purchased from Rio Grande, www.riogrande.com/. Cup bur may be purchased from Amazon


